Lyon Valley Northern

This site is designed to promote the hobby of ferroequinology. It provides an opportunity to show the development of the "Lyon Valley Northern": an HO railroad featuring CN and BNSF action in the West. Please feel free to contact me if you have questions or comments at cnlyon@sympatico.ca

My Photo
Name: Chris Lyon
Location: Ottawa, Ontario, Canada

Retired

Friday, March 28, 2008

Corner Farm

Well, I kept on going into the corner and around so that I could put the farm and beaver pond in.

Here is a shot from the track which shows the entrance to the farm. It comes off a road that was painted on the backdrop. I used very similar techniques as I did before.

This angle you can see tire tracks which I put in with my Athearn John Deer Tractor. Again the fence will get it's wire when it has dried and hardened.


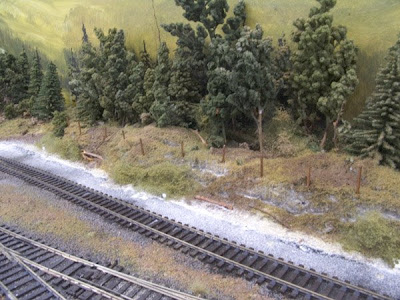
Here is a closeup of the area along the wall. It is only three to four inches wiede. A single line of trees with woodland scenics bushes and fence posts. This is raised with 1/2 inch foam covered with celluclay.


Here is a picture of the joint between the new scenery and the stuff I did yesterday.


A closer look at the corner you can see the full effect and the fact that the corner almost goes away.


Here is a picture taken from the right side. You can see the beaver pond followed by the area where the farm yard will go.


From the farm there is a road that goes down to the pond. There are three levels. This is the upper pond and dam. The middle pond area is to the right and the road goes right into it. Eventually there will be some cows in here drinking and cooling themselves..


The closeup shows the detail as well as a beaver nibbling on a stump.


Here is the lodge built on the middle pond. A beaver can be seen at the bottom right.


There are two of the little fellas and in behind you now can see the lower dam.


Here is the corner area where the farm yard will be built. House, barn silo windmill and stuff.


This took about six hours to do. I had lots of fun and I hope I can encourage you to give it a try.

Thursday, March 27, 2008

Scenery step by step

As promised. Here is the step by step process of doing this style of scenery.

As you can see there are a number of products needed. Tape, newspaper, buckets, sprayer, white glue, brown ink, celluclay (grey), ground foams, static grass, toothpicks, Eylmer's spray glue, wet water, dirt and grout. Oh yes. Trees.

The first step is to lay a long narrow chunk of 1/2 inch foam along the way. This is inexpensive fill that gives some elevation between the track level and the backdrop. Then mix up some celluclay to a mud consistency using water, white glue (2 large blobs) and a couple of drops of dish soap.

Then take a trowel and spread it over the foam. Try not to be smooth. Create cuts by pressing down along the edges and pushing up here and there.

Make sure you put painters tape over the track and put down newspaper to protect you surfaces.

Then put diluted white glue over the clay so that it wets all of the surfaces. This provides good contact for the other material you can apply.

I take the fine woodland scenics angle hair type material and stretch it out thin and then apply in in small linear clumps between the wall and the new celluclay hills.


I also add dirt and then grout to cover the upper surfaces. Make sure it is random and you let some of the grey show through.

Sprinkle on some mixed grass and then burnt grass ground foam and put in your trees. Starting from one end in the back and working forward. Move to the right and repeat.


Here I am applying some grout over the ground foam. This effect makes it look like the grass is coming right through the dirt. spritz with wet water so the grout dampens then hardens.


I also used some Noch static grass applicator action with woodland scenics static grass. I spray with Eylmer's glue and apply it in layers. Medium green covered by burnt grass. Then I again put grout over it in places to create paths and earth areas.


Here is an overview of the progress.


Lela helped out by staining some toothpicks that I used to make fence posts. These wooden picks were cut in half and stained with brown Warhammer stain (dark brown).

They were applied along the front ridge. This creates interest and depth and defines the scene. Also sticks were broken up and placed along the front edges as well as more bushes similar to the ones created between the hills and the wall.

I removed the tape and added diluted white glue between the celluclay and the track.

Added dirt, grout, grasses and bushes. The closeup also shows an elk. When it is dry I will go in and use thread and string three strands of barbed wire. Hope you enjoyed this and it may help you in your scenery endeavours.

Tuesday, March 25, 2008

The back wall: Backdrop Scenery and Trees to Match

This is here to whet your appetite. My next post will show the step by step process. The trees I built are partially used along this 20 ft project that is about 4-6 inches wide.


Friday, March 21, 2008

Trees trees trees


Had a great day making trees for the LVN. Three hours of work. In order to progress the scenery you need to make up a batch of the trees to get you going. Number 1 priority is trees for me it gets my juices going. Without them you cannot go forward (at least I can't). I got 25 feet of scenery to do on Sunday. I used sedum and the old bottle brush for starters.. After careful trimming, I dip them in a 50/50 mixture of white glue and water. Then, I stick them between my thumb and forefinger, upside down in an old ice cream bucket and give them in a spin, till most of the glue has left the park. I learned this from my good friend Mike Hamer. Next, I apply copious amounts of green woodland scenics grass, weeds ...all fine stuff and then sprinkle earth blend as a light dusting. In three hours I made all these trees /.....Great fun. You can shape em with little nips with you scissors. Just leave them in the foam to dry. Next stop the layout


Tuesday, March 18, 2008

Kingston Railfan Opportunity

Had a great day in Kingston on Monday. Was down for a meeting at RMC in the Afternoon. It gave an opportunity to spend an hour on station road off Hwy 15 where I cought the first three freights. After the meeting I went to the east end of the VIA station platform and saw a parade of CN Freight trains and VIAs. Had to call it a day as it started to get cold and the light was failing. All in all a great time.


Sunday, March 16, 2008

Working on the Visible Staging Yard

pens and it was great fundn. We applied a variety of colours, tie brown, rail brown, grimey black, mud and rust.

Then later in the day Jim joined me for a few hours of laying in dirt, grout and ground foam.

Jim then learned to apply celluclay to create a rock face and he added scenery using my tried and true techniques and blended it in to the previously finished areas.
Here is the shot from the completed work facing toward the golf course at the far end of the yard. This initial layer separates the main from the passing and classification tracks.


Here is a view near the throat and you can see the spur in detail


From the other end of the yard you can see that you can accomplish alot in one day.


This wild angle really shows the rockwork I did next to the flour mill siding.


Here is Jims work as it is drying.


This was the sample I did first next to the Mill siding across from the golf course.


Looking forward to work on the backdrop area so that this scene will be ready for the convention.

Friday Night Group Visit

Had ten FNGers over to the LVN to conduct two steady hours of operations

Here Stan and Joel are switching out the grain terminal.

Later, Normand working with Mike Hamer moved bulkhead flats from the siding to lift onto their mixed freight local.

You can see Ron and Andrew working the Stbd coal mine in the distance. Joel and Stan are busy shifting their locomotives onto a 12 car set of BNSF hoppers


Her is Andrew throttling up his coal drag while Ron watches to make sure the turnouts are clear at the other end of the classification yard.


Ron and Andrew wait as Stan backs his BC Rail locomotives into the yard.


Bobby did an oops, accelerating instead of stopping, which caused an accident in the container terminal. Everyone came over to take part in this highlight of the night. The O scale figure was knocked clean over by these HO cars. Deadly deed did not go un-noticed


Stan and Joel are hard at work pulling these grain cars to the flour Mill


Here is Bobby enjoying these pair of GP60Ms


Of course the beavers really had a good time and had moved to the VIA station near Hamer curve. They really enjoyed kabitzing with the passengers and watching the main line action.


Here you can see Bill and Jim operating Richmond yard: the time saver. They did it their way yet it did get done and done well.


Mike and Normand were busy switching the Cement plant


From this Angle you see the NAR SD38-2 about to latch onto a cement hopper as the BNSF Coal Drag goes by on the main.

It was a great night and we had Beer, pop, tea, coffee cake and cheese curdes after.

All was done by 22:00 as we were on the road the next day to Kingston for their railroad show and the NMRA SLD meeting.

Sunday, March 09, 2008

Beavers arrive on the LVN

Well I had great success at the CSS07 Craftsman convention in Mansfield this fall and picked up a dozen of these beavers for the LVN. They are made by Moose Models.


First step was to paint them with black primer so that I had a good dark coat for the fur paints to stick to. The Warhammer paint is in a spray bomb "Chaos black" and it is really fine.


Next I applied bestial brown as the first coat then dry brushed the dark flesh and then the dark flesh mixed with vomit brown last on the upper surfaces. When dry I put a wash of brown ink on the tail, feet and underside. Next I made a 3/1 wash with water and ink and ran it over the rest of the beaver so that it would darken in the grooves bringing out the fur detail.


Here are the finished beavers on the sprue. Next I cut them free using sprue nippers

They started their journey at the port coal mine and were in search for a good stream to build a dam. Here they are crossing the double main heading for the maintenance road.


This close up shows them making there way while the RCMP watch to ensure these national treasures are not bothered by local residents.


They look to be quite busy wondering toward the tracks


Later in the day, they have managed to make their way to the crossover just in time to see a GP60M with a container train roar by.


At beaver height it is quite exciting as a number of them get up on their rear haunches to view the passing train. The more focuses ones are continuing their journey without any consideration of the trains near by.


These guys have over 30 real feet to travel to the farmland where they will begin their dam on the stream. Maybe the farmers can use the pond to water the cattle.

Saturday, March 08, 2008

Stbd Coal mine run by

video

It sure was fun having this meet at the classification tower right next to the Stbd Coal Mine. The Engineer of 112 winks his ditch lights as he passes the CEFX grain special.

Friday, March 07, 2008

Rob's Steam visits the LVN

Rob came over and we oiled his steamers and gave them a run. It was quite something to have the chuff chuff chuff, ding ding ding and the sound of a whistle on this modern layout. Excursion at its best and this video gives me an opportunity to share that experience with you.
video

It was really nice to see the steamers work up a sweat with this modern rolling stock.

video

I think this inspired Rob to get home and complete his benchwork so that he can run some trains and enjoy the action on a more regular basis. Thanks for the visit. I had a blast.